• Home
  • Posts RSS
  • Comments RSS
  • Edit
Blue Orange Green Pink Purple

featured post

Homemade Granola

Recently I tried making my own granola. It ended up being quite simple, and I recommend trying it yourself. Dakota and I both find most store-bought granolas way too sweet and full of "extra" flavors. So, my goal was to make granola that was simple, healthy and tasty.

Read More
Showing posts with label food. Show all posts

Successful Peach Harvest

homegrown peaches
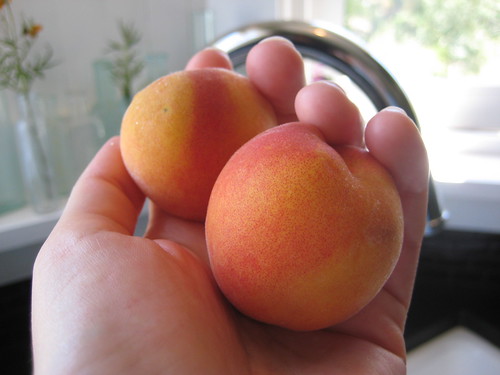
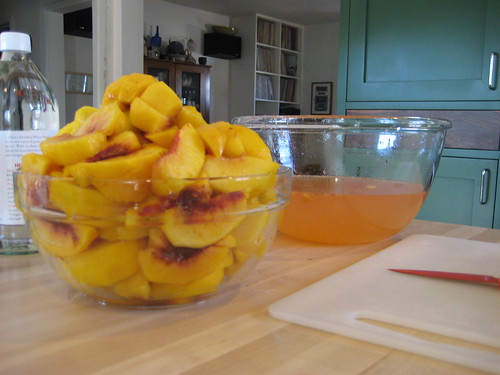
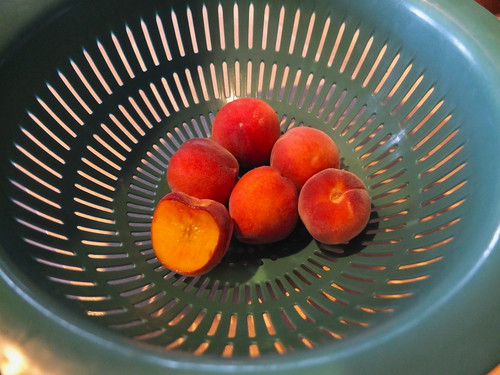
This year's peach harvest from the Desert Gold tree in the backyard was our best one yet. The peaches were small, but really sweet and flavorful. After eating one, my son asked if he could have them all. (I made him share a couple with me and Dakota.)

More importantly, I managed to harvest almost all the ripe peaches before the were gobbled up by those darn squirrels. (By the way, allow me to recommend the Those Darn Squirrels! books to parents of toddlers. They are really funny, smart and nicely illustrated.) I purchased some garden netting to protect my fruit from those fuzzy-tailed jerks, but didn't get a chance to put it up before the peaches ripened.

Anyway, speaking of small peaches, does anyone know why that might be? Should I be watering more or less? Pruning or fertilizing more aggressively? Do I just need to wait until the tree is older and bigger, or is this the normal fruit size for this variety?

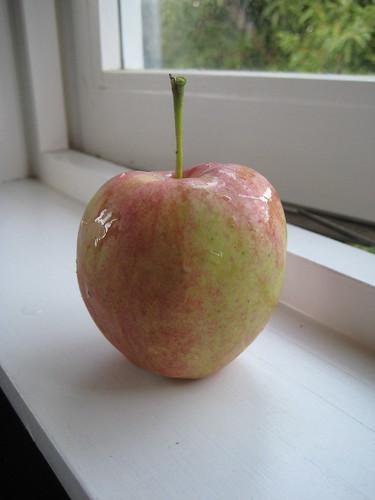
Even if the Desert Gold has small fruit naturally, I still highly recommend it for inland Southern California gardens. This tree has been the most productive of all the trees in my backyard orchard. Its neighbor, a Pink Lady Apple, has failed to make a single fruit in the last five years!
Read More 3 comments | Posted by Audrey |

Summer Favorite: Pole Beans

Kentucky Wonder Beans
One of the fondest memories I have of gardening with my dad when I was a kid is picking and eating green beans right off the vine. The smell and taste of fresh-picked pole beans is one of my favorite sensations of summer.

This year, I've been happy to have several towers of beans thriving around my garden. Regular readers of this blog (aka my parents) know that my big summer garden plans don't always pan out. But, this year, I have had some success--and, of course, several failures. My pole beans are my biggest triumph so far.

I have one tower growing in the upper bed, and three more down below in the lower raised bed. All are currently covered in leafy vines and starting to create pods. I am growing pole beans, because I like the winding vines and they save space. The varieties I picked this year, Kentucky Wonder and Cherokee Trail, are from Seed Savers.
Scarlet Runner Bean
The Cherokee Trail beans have black seeds and dark pink flowers. They haven't made pods yet, so I can't speak to their taste, but here's the interesting description from the Seed Savers site:

(Phaseolus vulgaris) (aka Cherokee Black) Given to SSE in 1977 by the late Dr. John Wyche, SSE member from Hugo, Oklahoma. Dr. Wyche’s Cherokee ancestors carried this bean over the Trail of Tears, the infamous winter death march from the Smoky Mountains to Oklahoma (1838-1839), leaving a trail of 4,000 graves. Green 6" pods with purple overlay, shiny jet-black seeds. Good for snap beans and dry beans. Pole habit, snap or dry, 85 days.
I love their descriptions of heirloom varieties. They really add an extra layer of historical interest--and drama--to regular old vegetable gardening. Plus, it makes you feel like you're helping carry on a tradition just by planting them.

The beans we're currently eating are the Kentucky Wonders from the upper bed, which I planted first. My upper bed hasn't done so well lately. It's exposed to chicken interference and skunk destruction, and I worry the soil is a little tired. But the pole beans don't mind--perhaps because they grow upward and away from those pesky animals. When they reached the top of their pole tower, I attached a string, and have been training the vines that way.
green beans
I really like how that looks, maybe because it gives an impression of overflowing abundance. Or maybe it's because the delicate bean flowers are more exposed.

So, it looks like we'll be enjoying fresh beans for at least another month, maybe longer. My son is not a huge fan yet, but he's had some bites and plans to have more. I'll make him a pole bean lover by summer's end, I'm sure.
Read More 0 comments | Posted by Audrey |

Hey look, blueberries!

blueberries
So, it seems like I may get blueberries after all! Even though the two bushes that were supposed to be cross-pollinating each other didn't bloom at exactly the same time, there are still little berries forming on the earlier-blooming bush, a variety of southern highbush called "Misty."

I'm a bit confused, as I was assured by both the Internet and the guy at the nursery that cross pollination was necessary to get fruit. I guess the berries might not make it all the way to maturity, but they seem pretty real right now so I think that's unlikely. I'm really looking forward to picking and eating them in a couple more weeks.

The other bush, a variety called "Jubilee," has just started blooming, so the jury is still out on whether it will produce fruit. But I'm feeling lucky
strawberry
I've also got a pretty good strawberry crop coming to maturity in various containers around the yard. My son loves picking and eating fruit and veggies straight from the plant, and I don't blame him. It's pretty fun to grow your own food, especially since fresh picked is so much tastier than grocery store fruit.
strawberry

Read More 0 comments | Posted by Audrey |

Easy Cheese

Dakota got me this very cool book for Christmas called Home Made. It's got gorgeous pictures, and, most importantly, simple easy-to-follow recipes for making jams, biscuits, cheese and other basic but delicious fresh foods. In fact, the instructions for cheese-making seemed so simple that I decided to try making some for our New Year's Day party.

I made a soft, cow's milk cheese good for spreading called Labneh. The recipe is crazy easy, but I won't write it out here because I don't want to steal from the author of Home Made. I'm guessing you can find directions online pretty easily, although the book is worth purchasing. Basically, it involves yogurt, salt and garlic.
Making Cheese
You put all that stuff in a clean dishcloth. And here's a tip: Use a dish cloth, not cheese cloth. Cheese cloth is too porous for this particular method. Then, you hang your bundle-o-yogurt over a big pot or bucket and walk away. I left mine hanging--which strains out the water--for about 24 hours.
Making Cheese
Finally, you open up the dishcloth and put your cheese on a platter. Add fresh herbs and you're done.
Fresh Made Cheese
I thought the cheese was very tasty, and I got many compliments from my party guests. In fact, they ate it all, so I know it must have been good. Home Made has a few other cheese recipes that I'm hoping to try, including a sweet breakfast cheese with vanilla bean. Yum.

So, it turns out soft cheese making is one of those awesome things that seems really fancy and time-consuming, but are actually easy-peasy. I love those things.
Read More 3 comments | Posted by Audrey |

Figs

Figs!
I have exactly seven figs growing on my little fig tree this year. They looking pretty good and my tree is having its happiest and healthiest year yet. So, I'm hoping to taste some fresh figs in another month or so.

I'm considering tying some shiny ribbon to the tree or using some other anti-bird technique to protect those seven fruits. But I don't think ribbon is going to keep squirrels away, and I suspect they're the biggest threat to my figgy dreams. Any suggestion?
Read More 2 comments | Posted by Audrey |

Tater Tots

Last month, I took some potatoes from our produce delivery service that sprouted in the pantry and planted them in my garden. I put very little effort into my potato patch, since it was more of a small experiment than a real effort to grow potatoes. Plus, I had a rather spectacular failure with potato growing a couple of years ago.

Well, a couple of weeks ago, I noticed the stalks had died back on all the potato plants, so I decided to go ahead and dig them up. My expectations were low, so I was happy to find a small cluster of tiny yellow potatoes buried under the dirt. I guess I ended up with around 3/4 of a pound. A small crop, but I was happy to have been successful.
potato crop
I roasted my little crop of tiny taters with olive oil, salt and pepper. They were very tasty! Was it the freshness or the sense of accomplishment? Who can say?

I think next year I might try to grow some more potatoes in a deeper hole. One thing I learned is, in Los Angeles, it's best to grow potatoes in the spring. I think last time the weather was too hot and dry when I started my crop, which made the stalks droopy, which caused me to over-water and rot my seed potatoes. That's my theory anyway.
Read More 1 Comment | Posted by Audrey |

Fresh Picked Strawberry

fresh strawberry
I picked this beautiful, bright-red strawberry from one of my potted plants last week. It was delicious.

I think next spring I'm going to try to grow a whole patch. I suspect my son will really enjoy picking and eating them right from the garden.
Read More 3 comments | Posted by Audrey |

Reuseable Lunch

reuseable sandwich bags
One of the many ways Dakota and I attempt to be both frugal and healthy is by packing our own lunches as often as possible. I think Dakota manages it more often than I, although my job involves going out to lunch several times a week, so I have an excuse. Several years ago, I came across some reusable sandwich bags and thought they were a great idea. I purchased some, and we've used them instead of disposable plastic sacks ever since.

The first variety I picked up, which we still have, are called Wrap-n-Mats. They're basically a flat rectangle with the corners cut off. One side is cloth and they other side is plastic. You place your sandwich in the center, fold the mat around it and fasten with a strip of Velcro. They work quite well, and, when you open them up, they make a nice little surface to eat off at your desk.

Recently, I picked up two other varieties of reusable sandwich bags from a website I like called reuseit.com. One was their own store brand of bag, and the other is made by LunchSkins. They're both pouch-style bags, which means they work for sandwiches, but you can also fill them with crackers or cookies or carrots.

I don't have a strong preference for any particular type of reusable sandwich bag, but I do recommend them as a great way to stop using disposables. They're not cheap, but if you use them several times a week for years, then I think they'll cost a lot less than disposable bags. Or, if you're crafty, make them yourself with some oilcloth or other water-resistant material. I've seen some really cute snack bags on various craft sites that I'll probably make for my son when he starts taking his lunch to school. All you need is a little bit of cloth and some Velcro.

Another thing I'd like to do is start taking my own containers to take-out places. We don't get take-out food that often, but when we do I always feel bad about how much plastic and--horrors!--Styrofoam is involved in packaging the food.

In case anyone is wondering, I am not getting paid for talking about these products or the website. I sometimes get those offers, but haven't taken anyone up on them so far. If I ever do get a free product, I will be sure to mention that fact in the text of the post.
Read More 2 comments | Posted by Audrey |

One Delicious Apple

one and only apple

Check out this lovely apple. I picked it last weekend from the Anna Apple tree I received from a Tree People fruit tree giveaway and planted last winter. Dakota and I shared it, and it was pretty tasty. I think I left it one the tree a bit too long, though, because it wasn't as crisp as I hoped it would be. Still, this is my first homegrown apple.

I guess the Anna Apple was a great choice for my yard. At the fruit tree giveaway last winter, I specifically asked for a variety with a low number of chill hours. Chill hours are the number of hours below 45 degrees Fahrenheit that a tree must experience in order to bear fruit. The Anna has a low chill hour requirement and is supposed to be very well suited for the dry Southern California climate. That proved to be true, since it bore fruit the very first year. Next year, I think there's a good chance we'll get several apples, not just one.

I also have a Pink Lady Apple, which hasn't been at all successful. It's been in the yard for a couple of years and never even made a baby apple. I have no idea why. I water it frequently, fertilize occasionally and try to keep it nicely pruned. The area where it's planted will now get a lot more sun, though, because we recently got new neighbors and they trimmed the jungle of a backyard next door. I'm hoping the extra sunshine will help the Pink Lady produce fruit next year.
Read More 1 Comment | Posted by Audrey |

Summer Peaches from the Backyard

homegrown yellow peaches

Finally, some fruit tree success! I picked these lovelies from the Desert Gold peach tree in the backyard a couple of weeks ago. Since then, I've picked and eaten three more peaches, which were all the tree produced this year. That's actually a pretty good crop from my sad little backyard orchard, so I'm happy about it.

Unfortunately, the first two peaches were not very tasty. They had a watery, mushy consistancy that I didn't really enjoy. I think it may have been because I was watering the tree too much as the fruit was ripening. I picked the rest of the peaches after taking a break from watering and they were delicious. So, another lesson learned.

I should probably get a book on fruit trees so I stop making these rookie errors. I've had a book called The Home Orchard on my wish list for a little while. Do any of you have that book or another that you'd recommend? I don't have a lot of reading time these days, so I need more of a reference I can turn to for tips rather than a book I'd need to read cover-to-cover.

Anyway, I am happy about the small peach crop, and I hope next year brings even more fruit on that tree. There's really nothing like a freshly-picked summer peach.

Next up: the fig tree. I spotted some baby fruit this weekend. I don't expect a bumper crop, but I'm hoping to get a handful of figs before the bugs and squirrels get to them. Wish me luck!
Read More 1 Comment | Posted by Audrey |

Fresh Favas From the Garden


I whipped up this tasty, colorful salad last week from my first bunch of homegrown fava beans. It's a variation on a recipe I found here. I used fresh goat cheese, because that's what was in the fridge, and added a bit of lemon thyme from the herb garden along with the fresh parsley. The salad was a nice, simple way to eat favas, which is key since fava beans themselves take a while to prepare.

Speaking of taking a while, until recently, I was afraid my fava plants were never going to make pods. The stalks grew like crazy and made lots of flowers, but the bean pods didn't appear until mid-March. Happily, when they did finally appear, the pods quickly grew big and thick.

fava bean pods

I think I'll get one more decent harvest from the favas. I had hoped to get more, but I think the weird Spring weather--warm, cold, warm, cold--may be confusing the plants a little bit. I might also space them a bit farther apart if I plant favas next year. I suspect the plants might make more pods if they have more room and aren't competing with each other for nutrients.

Still, it was a successful and satisfying first fava crop. I'll definitely grow fava beans again, especially since they can be hard to find fresh at the store.
Read More 1 Comment | Posted by Audrey |

Rains Bring Big Harvests

Due to some unexpected craziness in my life, I was away from my garden for almost the entire month of February. In that time, several storm systems blew through Southern California and deposited several inches of rain in our yard. The timing was excellent, because my vegetable plots were all in the middle of their growing cycles, and it meant I didn't have to ask anyone to water the garden in my absence. In fact, the rains were so substantial that I returned to my garden at the beginning of March and found it like this.

winter garden after some rainy weeks

That crazy mess of green is what happens when you leave a vegetable garden untended but well watered. At first I was kind of overwhelmed by the disorder, but when I looked closer I realized that ignoring my garden for a month meant I could now enjoy the satisfaction of some pretty hefty harvests.

My first harvest is pictured below: three baseball-sized turnips and their green tops, a handful of peas and two eggs. (Yes, Peggy finally started laying again at the end of February, perhaps to welcome me home.) We cooked up the turnips with some carrots from our produce delivery box using a delicious recipe for braised root vegetables from How To Cook Everything. The peas were delicious raw, pods and all. Fresh-picked peas are so much sweeter and crisper than the ones you buy at the store. There's really no comparison.

first big winter harvest

Subsequent trips to the garden provided us with a delicious salad mix of oak leaf lettuce, arugula and cilantro--which Dakota and my mom both raved about--and this lovely bunch of chard. The chard went into one of my favorite simple winter recipes, Bacon and Swiss Chard Pasta. Yum.

chard harvest

A few days later, I filled up my basket again with more peas, a big pile of peppers and some spinach, all of which were consumed with some grilled bratwurst.

Big winter harvest

All this harvesting has been extremely satisfying. I think I'm having my best vegetable garden season ever. There are so many more crops yet to pick--beets, fennel, fava beans--and the greens and peas have shown no sign of slowing down. Dakota and I can count on at least another month's worth of home-grown vegetables in our meals.

Who knew that the best thing I could do for my winter garden was abandon it?
Read More 0 comments | Posted by Audrey |

Winter Garden Progress

So far, things are going pretty well with my winter vegetable garden. I have seedlings popping up everywhere, including some nice-looking beets in the big raised bed, plus some chard, turnips, collards and lots and lots of radishes.

beet seedlings

Another happy crop is the fava beans, which are growing like crazy. I keep waiting for them to begin flowering, though. Thus far, they're all stalk and no bloom. It's possible I planted the favas a bit too densely, but they seem hearty at the moment, so I'm not going to worry about it. Fava beans don't really seem to climb naturally, but I'm having good luck weaving them around the supports of my bean poles, and I tied up some stray stalks this weekend to keep them from wandering into neighboring plots.

fava beans

I'm also having excellent luck with the oak leaf lettuce. Any day now, I'll enjoy a salad of these pretty green leaves. I'm considering waiting until there are one or two radishes ready to harvest, though, so I can have a little garden salad. The radishes are growing quickly, so it shouldn't be too long.

oak leaf lettuce

My garden netting has kept most digging predators away, so my main issue this winter is bugs. Something is really going after my bok choy. I've got it planted in two different squares in the big raised bed, and in both locations the leaves are under attack. I haven't seen any slugs or snails around, so I'm not sure what creature is doing this. Could ants be the culprits?

something is eating the bok choy

There are certainly plenty of ants wandering all over the garden. I'm worried that'll mean big aphid trouble very soon. I have sprinkled some diatomaceous earth around the beds, but the ants don't seem particularly concerned by it. Is boric acid a better bet? I've never used it. I don't mind ants, but I absolutely hate the aphids ants bring. They are so ridiculously hard to get rid of once they take hold.

Oddly enough, the mystery bug appears to be sticking mostly to bok choy, with only the occasional dalliance with the chard or fennel. The bok choy seems hearty, though, so maybe it'll make it past the seedling stage without being completely destroyed. I have it planted in my upper bed as well, so it might have more luck there.

The only other concern has been the too-warm weather. I don't want my greens to bolt before they're even big enough to eat. Temperatures have cooled down a little, and I really hope that once December gets here we'll have mostly cool days for the rest of the winter. Those high-70s days might be nice for working outside, but they're no good for growing winter greens.
Read More 2 comments | Posted by Audrey |

Delicious Vegetarian Enchiladas

I have never cooked enchiladas before, but the other night, inspired by this recipe on Homesick Texan, I decided to try it. As a native of San Antonio, I have always been a fan of Mexican food, but I rarely cook it at home. (Well, we eat a lot of quesadillas, but that doesn't count.) Something about Homesick Texan's recipe reminded me of one of my favorite dishes, Enchiladas Suizas, and I wanted to see if I could recreate the tangy/creamy flavor in my own kitchen.

Also, I have been looking for a good way to use Trader Joe's Chicken-less Strips, and this recipe seemed perfect. It has plenty of sauce and spice to mask any possible weird fake meat flavor.

As my first step I pan-fried the Chicken-less Strips in a little bit of vegetable oil, just to brown them and warm them up a bit. When it's in the pan, you can barely tell it's not real chicken.

After that, I followed Homesick Texan's recipe relatively closely, although I halved it because I don't think we could eat 12 enchiladas in one sitting, even with Dakota's large appetite. Instead of canned tomatillos, I used canned salsa verde, because that's what was in the pantry. And I used vegetable broth instead of chicken broth, to keep the whole dish vegetarian.

Below you can see the enchiladas just before they went in the oven. I used Homesick Texan's tip about briefly heating the tortillas in a lightly oiled frying pan, and it really helped. Store-bought corn tortillas can be really brittle, but the few minutes in the pan made them easy to roll up.

And here are the enchiladas ready to eat. I found them exceptionally tasty. The combination of sour cream, salsa verde and jack cheese was just right; the flavor took me back to some of my favorite Tex Mex meals. And, honestly, I thought the Chicken-less Strips did their job nicely. They provided some extra protein in the meal and kept the enchiladas from being too mushy and cheesy.(Dakota felt the texture was a bit off, but he still gobbled up his enchiladas, so it must not have bothered him too much.)

Overall, I found enchiladas to be a pretty easy dish to cook. They might be better for a weekend dinner because of the time it takes to prepare the sauce, but I can imagine making them on a weeknight, especially if you make the sauce in advance (and get home from work before 7:30). I'm not sure why I was so intimidated by enchiladas in the past, but I definitely plan on making this recipe again soon--perhaps for some vegetarian friends when we finally start having people over for dinner again.

Read More 1 Comment | Posted by Audrey |

Homemade Granola


Recently I tried making my own granola. It ended up being quite simple, and I recommend trying it yourself. Dakota and I both find most store-bought granolas way too sweet and full of "extra" flavors. So, my goal was to make granola that was simple, healthy and tasty.

My batch was made using this recipe from Curious Bird blog, with some minor changes. I also doubled the recipe, because we tend to go through cereal pretty quickly. I am storing some of the granola in a mason jar in the freezer where it will keep longer, and the rest has been steadily disappearing from the pantry.

Basically, you just stir together a bunch of oats, nuts and coconut flakes, add a little sugar, spices and oil and bake the whole thing in the oven until its toasty. Then you add raisins or other dried fruit and you're done. Simple as that.

I may experiment a bit more on my next batch, but probably not too much. The point is to have a simple, hearty breakfast cereal for less than it would cost in stores. So, getting too fancy would be beside the point.
Read More 3 comments | Posted by Audrey |

Farm Fresh Delivery

We started using an organic produce delivery service last month, and so far I really like it. The company is called Farm Fresh to You, and I originally learned about them at the Los Angeles County Fair.

I've been interested in joining a CSA or produce delivery service for a while, but I hesitated because many of them require you to sign up for a whole season. What's nice about Farm Fresh to You is that you can join or cancel whenever you want. You can also easily change your delivery frequency, box size and produce type on their website. And you can let them know if there are certain fruits or vegetables you're not interested in getting, so you don't get a delivery of something you won't eat. The user-friendliness is really great, and the produce is fresh and flavorful.


The photo above shows our second delivery. That's the "regular mixed" box, which we're currently getting every-other week. It had a good mix of seasonal fruit, including oranges, apples and grapes, and Fall vegetables and greens. I like how this kind of service helps me plan meals around seasonal produce. It gives me a starting point, and then I search for recipes that use what I've got and sound tasty. I've never cooked with pumpkin before, and I'm not sure I would have if one hadn't shown up in our box.

Another thing I like about Farm Fresh to You is that they tell you exactly where each item in your box is grown. Most of the produce comes from California, with a couple of items from further up the West Coast (apples, pears). The company's first farm was in the Capay Valley, near San Francisco, but they now have farms closer it Los Angeles in Riverside County and near San Diego. That means the produce is all relatively local--perhaps not as close as farmers market veggies, but much closer than most supermarket produce.

The combination of convenience and variety is really working for us so far. I'm looking forward to receiving our next box this Wednesday.
Read More 4 comments | Posted by Audrey |

First Time Pickling: Peaches, Peppers & Beets

Last weekend, I finally got a chance to do something I've wanted to try for ages: home canning. Canning seems like the perfect marriage of all my favorite hobbies: gardening, cooking and making gifts for people. Dakota got me a bunch of canning supplies for my 31st birthday, and, a year later, I finally got a chance to try them out.

The first step was shopping for supplies, which was more difficult that I expected. I picked up some cases of Ball canning jars at Orchard Supply Hardware. They had several sizes in stock, although not the pint jars called for in most of my recipies. I just decided to make do with the three sizes available. OSH also sells cheese cloth, which you'll need to make a spice bag. The spices I needed were more difficult to track down. I went to three different stores, including Whole Foods, looking for pre-mixed pickling spice--or the all the spices that go into pickling spice mix--and finally found it at a Jon's market in Glendale. (LA Cooking Tip: If you're looking for an unusual ingredient, try a grocery store that in or near an Armenian neighborhood. This Jon's had three different spice sections: typical American, Middle Eastern and Latino. And the Super King in Glassell Park has all kinds of interesting fruit syrups to use as marinades.) For the fruits and veggies, I woke up early and hit the Pasadena Farmer's Market. That place is great, although they didn't have any "dill heads," so I had to go with baby dill.

canning supplies

Once all the supplies were assembled, my friend Merete and I began the pickling process. This is when I learned that prep work is the most time consuming and labor intensive part of canning. We chose three things to pickle: beets, peaches and peppers. All the recipies--and canning guidelines--came from my Ball Complete Book of Home Preserving. The beets needed to be pre-cooked and skins removed, the peppers needed to be chopped, and the peaches needed to be peeled, sliced and soaked in a solution of water and lemon juice to preserve their color.

Merete peels & slices

Luckily, I had a friend to help me. Canning is definitely more fun--and less exhausting--with two people. I don't think I would have been able to pickle beets, peppers and peaches in the same day without Merete's help.

bowl of peppers

By the way, I recommend keeping that lemon water you soak your fruit in. It lives a second life as a refreshing and delicious beverage. This was Merete's idea. Not only is she an excellent kitchen companion, but she comes up with brilliant new beverage concepts like peach water.

sliced peaches and peach water

Once the prep work was complete, we started canning. First up were the pickled beats, and we learned a valuable lesson after we ran out of pickling juice half-way through filling the jars. We followed the recipie to the letter, so at first we were confused. Then we realized that we hadn't cut our beets small enough. If we'd sliced them smaller, they would have taken up more space in the jar and needed less pickling juice. Oh well, we still got four jars out of it. And for our very first canning project, I think that was a fairly minor error.

jar of beets

Next came the Dilly Peach Pickles. I cannot wait to try these when they're ready. Some people may turn up their noses at pickled fruit, but I think it sounds amazing. Plus, the peaches and dill look so pretty in their big jars. Merete and I sliced the peaches into sixths to avoid the pickling juice issue we had with the beets.

peaches in jars

I'm skipping over the details of actual canning, because I think that's best explained by an expert, or the authors of Ball Home Preserving. I found the directions in that book very clear and helpful, and the recipies were interesting without being overly complicated.

I can comment on the tools I think are most necessary, though. They include: a jar grabber, a lid lifter (a plastic stick with a magnet on the end so you don't touch the sterilized lid), a funnel, a good ladel, a slotted metal spoon, a metal rack to set your jars on while they boil and a giant canning pot. These all appear to be essential to the canning process, in my admittedly limited experience.

After following all the canning and boiling water processing directions, we ended up with seven jars of pickled peppers, three jars of pickled peaches and four jars of pickled beats. It took us all day to can everything, but this was our first time. Happily, after the required 24-hour cooling off period, I checked the the lids and each and every one seems to have sealed properly. I really like the way they look in my new pantry.

jars stored in pantry

Overall, I found home canning to be interesting, fun and satisfying. It's kind of like doing a science project that you can eat. Having a friend with me definitely made it more enjoyable. Hopefully I can have more friends over for canning parties in the future. For my birthday this year, I received The Joy of Pickling!


Read More 1 Comment | Posted by Audrey |

Summer Garden Summation

As usual, I had mixed success with my summer garden this year. I'm not sure why I tend to have more trouble with my summer crops, maybe it's my sun exposure, soil composition or poor watering technique. Whatever my problem is, it makes for a summer garden that provides equal amounts of excitement and disappointment.

In an attempt to ensure tomato success this season, I planted only small fruiting varieties. Happily, all three types I chose produced attractive, tasty fruit. The most prolific and hardy were the Mexico Midget and Hartman's Yellow Gooseberry heirloom varieties, which I purchased from Seed Savers. I particularly recommend the Hartman's Gooseberry. They're a lovely, gold color and have a tart, fresh taste that even I, a professed tomato-hater, kind of enjoy.

The Austin Red Pear tomatoes were the most temperamental variety. They were annoyingly prone to blossom end rot, despite diligent mulching and plenty of crushed eggshells in the soil. This surprised me, because I've grown other pear tomatoes in the past with great success. The plant that did best was the one planted in the front yard. The Austin Pears in containers lost about half their fruit to the evil rot.

small tomato harvest

Notice that one yellow pear on the far left? For some reason, one of my red pear tomato plants ended up making yellow pears. I don't know if it was a plant mutation or if some of the wrong seed made it into my packet, but I don't mind.

Peppers were another successful summer crop. As usual, they began producing fruit much later than the tomatoes, but now that they're fruiting, things are going fairly well. The earliest harvest came from the Wenk's Yellow Hot. It's a thick-skinned, fat pepper that starts light yellow-green and then turns red. Next came my Maule's Red Hots, which look and taste similar to cayenne peppers. Both those varieties have been producing fairly steadily since late July.

Pepper Harvest

Unfortunately, despite the presence several leafy, healthy plants in my garden, I am still waiting on to try the Fish Peppers. I hope the plants bloom soon, because the fruit looks so pretty in the seed catalog pictures. I'm having similar issues with my Listada de Gandia eggplants. There are least five good-looking plants in containers and the ground, but not a single one has made an eggplant. I think I'm running out of time with those, because eggplants need hot weather to flower.

Earlier in the summer, I had some modest success with my green beans. I have a few plants left, but I think they're probably done producing for the year. I'll cut them off at the soil surface soon and leave their nice nitrogen-fixing roots in the ground to decompose.

My corn, sadly, has been a complete failure. This is my second year trying corn, and I think it may be my last. Corn takes up a lot of space and needs significant amounts of water. So, I think I give up on corn farming. It hardly seems worth it considering how cheap and plentiful corn is in summer farmers markets.

I have already documented my frustrating relationship with squash. So far, I've harvested only two yellow zucchini squash despite carefully tending to 10 plants. Sigh. I don't think I'm ready to give up on all squash just yet, but I will probably plant fewer hills next year to make room for some more reliable vegetables. And I am going to quit winter squash for a while. All sectors of my Los Angeles garden seem unable to produce a single winter variety. (I know it's possible, since Ilsa at Rambling LA grows gorgeous pumpkins in her yard.)

baby strawberry

To end my summer garden assessment on a brighter note, my first foray into strawberry growing has been fun and tasty. My two plants continue to spread in their pots and produce new fruit. I hope to keep them alive through the winter so I can have more delicious, homegrown strawberries from these plants next year.

Very soon, it'll be time to begin my winter garden. I've started a few seeds in pots, and will start working the soil this weekend to get it ready for planting. Hopefully, the weather will cool down by mid-October so my seedlings don't get scorched.
Read More 0 comments | Posted by Audrey |

Hot Wings Minus the Wings


Apparently, there are a lot of exciting sporting events happening these days. I am not much of a sports fan, and I don't think I've ever deliberately turned on ESPN. But, from what I hear, there are quite a few football, baseball and even basketball games on television on any given weekend in the Fall. Don't ask me what teams are playing, because I simply do not care. One thing I do care about, though, is snacks. I am a huge snacks fan.

The few times I've decided to sit down and watch a professional football game with my friends, it's primarily been because I was promised hot wings. I love the combination of crispy, chewy fried protein and spicy vinegar sauce. But, a couple of years ago, I gave up eating chicken. How could I hang out with my favorite hens, Peggy and Tina, and then go inside and chow down on the fried wings of their unlucky factory chicken relatives?

Several weeks ago, I came up with a nice solution to this little conundrum, and I thought I should share it with other devoted snack (and sports) fans. It provides the crispy/chewy consistency of hot wings, plus the delicious spiciness, without the actual wings. I don't really have a name for this dish, so let's go with, um, Crispy Spicy Tofu Bricks. If anyone can think of a better name, let me know.

CRISPY SPICY TOFU BRICKS

For bricks:
1 pkg firm or extra-firm tofu
1 bottle Frank's Red Hot Sauce
1 cup flour
1 teaspoon cayenne pepper (or more, to taste)
2 cups canola oil
4 stalks celery
salt
pepper

For dip*:
1/2 cup sour cream
1/4 cup finely chopped scallions
2 tablespoons finely chopped flat-leaf parsley
1/2 cup crumbled blue cheese (2 ounces)
2 teaspoons fresh lemon juice
1 1/2 teaspoon milk

Cut tofu block in half lengthwise and press out the water by squishing it between two cutting boards. Put paper towels on the top and bottom to soak up the water. After the tofu is pressed, cut it into rectangular strips about the size of your thumb. Place it in a container and add about 1 cup of hot sauce, coating the tofu. Put in the fridge to marinate at least an hour.

Make the dip.
Cut the celery into manageable pieces.

Combine the flour, cayenne pepper, salt and pepper on a plate. Heat the oil in a deep saute pan over medium heat. When the oil is hot, start dredging the tofu in the flour mixture, covering all sides. (It should be wet enough that you don't need to dip it in egg or milk.) Place the flour-covered tofu in the hot oil, laying it on one of the long sides, and fry it until it turns golden brown. Flip tofu onto the next side, and fry until that side is golden brown. Repeat until all four long sides are golden brown. Remove from the pan and drain on a paper towel.

Put the tofu on a plate and dress with more hot sauce to taste. Serve with dip and celery.

Pretend to watch sporting event while consuming as many Crispy Spicy Tofu Bricks as possible.

*Taken from this recipe on epicurious.com
Read More 2 comments | Posted by Audrey |
Older Posts Home

GREEN FRIEDA

  • About
      This blog is about a variety of things I'm interested in, including gardening, backyard chickens, crafts, DIY home improvement and resource efficiency. My hope is that it's both informative and fun to read. I hope you like it. If you want to email me, click here.
  • Labels

    • animals (8)
    • baby (7)
    • bathroom (4)
    • cactus (1)
    • canning (1)
    • charities (3)
    • chickens (79)
    • compost (1)
    • crafts (9)
    • energy (8)
    • environment (24)
    • food (61)
    • gardening (137)
    • gifts (7)
    • good girls (10)
    • holiday (6)
    • home improvement (27)
    • insects (2)
    • kids (4)
    • kitchen (16)
    • native plants (16)
    • orchard (6)
    • pests (14)
    • politics (6)
    • reuse (16)
    • tips (10)
    • tree (1)
    • waste (2)
    • water (9)
    • wedding (2)

    Blog Archive

    • ▼  2014 (5)
      • ▼  June (2)
        • Chicken Landscaping
        • Poor Baldy
      • ►  May (1)
      • ►  April (2)
    • ►  2013 (20)
      • ►  November (3)
      • ►  June (6)
      • ►  March (5)
      • ►  February (3)
      • ►  January (3)
    • ►  2012 (13)
      • ►  September (1)
      • ►  August (2)
      • ►  July (2)
      • ►  May (1)
      • ►  April (2)
      • ►  February (1)
      • ►  January (4)
    • ►  2011 (33)
      • ►  December (3)
      • ►  November (5)
      • ►  September (1)
      • ►  August (3)
      • ►  June (7)
      • ►  May (2)
      • ►  April (4)
      • ►  March (1)
      • ►  February (4)
      • ►  January (3)
    • ►  2010 (34)
      • ►  November (3)
      • ►  October (2)
      • ►  September (4)
      • ►  August (5)
      • ►  July (3)
      • ►  June (3)
      • ►  May (1)
      • ►  April (6)
      • ►  March (5)
      • ►  January (2)
    • ►  2009 (94)
      • ►  December (6)
      • ►  November (8)
      • ►  October (6)
      • ►  September (6)
      • ►  August (9)
      • ►  July (13)
      • ►  June (12)
      • ►  May (12)
      • ►  April (3)
      • ►  March (8)
      • ►  February (6)
      • ►  January (5)
    • ►  2008 (54)
      • ►  December (4)
      • ►  November (3)
      • ►  October (3)
      • ►  September (3)
      • ►  August (7)
      • ►  July (6)
      • ►  June (9)
      • ►  May (2)
      • ►  April (2)
      • ►  March (4)
      • ►  February (7)
      • ►  January (4)
    • ►  2007 (16)
      • ►  December (3)
      • ►  November (1)
      • ►  October (3)
      • ►  August (3)
      • ►  May (2)
      • ►  April (2)
      • ►  February (1)
      • ►  January (1)
    • ►  2006 (28)
      • ►  November (1)
      • ►  October (3)
      • ►  August (3)
      • ►  July (1)
      • ►  June (4)
      • ►  May (5)
      • ►  April (1)
      • ►  March (5)
      • ►  February (2)
      • ►  January (3)
    • ►  2005 (10)
      • ►  December (1)
      • ►  November (1)
      • ►  October (2)
      • ►  September (1)
      • ►  July (1)
      • ►  June (4)

    Related Blogs

    • Homegrown Evolution
      Framed
      3 years ago
    • DigginFood
      How to gain popularity through buying Twitter followers
      8 years ago
    • The Tangled Nest
      The First Egg: Light, Life, and Gratitude
      9 years ago
    • Monkey Lobster
      Summer Slide Show
      10 years ago
    • Rambling LA
      LOSING YOUR LAWN
      11 years ago
    • Rancho Garbanzo
      3 1/2 years later - Our Wedding Photobook
      11 years ago
    • Urban Chickens
      Infographic time: the chicken coop checklist
      12 years ago
    • Ramshackle Solid
      Hoop and Pole
      12 years ago
    • Our Yellow House
      Still Knitting
      12 years ago
    Show 5 Show All
    Follow GreenFrieda on Twitter

    Links

    • Backyard Chickens
    • Tree People
    • Seed Savers Exchange
    • L.A. Works
    • to do something
    • Mohair Gravy

    Followers

  • Search


    • Home
    • Posts RSS
    • Comments RSS
    • Edit

    © Copyright Green Frieda. All rights reserved.
    Designed by FTL Wordpress Themes | Bloggerized by FalconHive.com
    brought to you by Smashing Magazine

    Back to Top