• Home
  • Posts RSS
  • Comments RSS
  • Edit
Blue Orange Green Pink Purple

featured post

Homemade Granola

Recently I tried making my own granola. It ended up being quite simple, and I recommend trying it yourself. Dakota and I both find most store-bought granolas way too sweet and full of "extra" flavors. So, my goal was to make granola that was simple, healthy and tasty.

Read More
Showing posts with label baby. Show all posts

Safer, Softer Play Dough

homemade playdough
I have always thought that making play dough for my son sounded like a good idea... in theory. But it also seemed like one of those things that might be a big pain in the ass, and I wasn't certain the final product would be as good as the store-bought stuff. But, my son started preschool last week and they use school-made play dough. It looks pretty great and all the kids love it, so I decided to give it a shot last weekend.

Turns out, it's easy and the dough at the end is actually nicer than the store stuff. I used this recipe from Instructables. It involves cooking the dough for a little bit, but was still quite simple.

homemade playdough
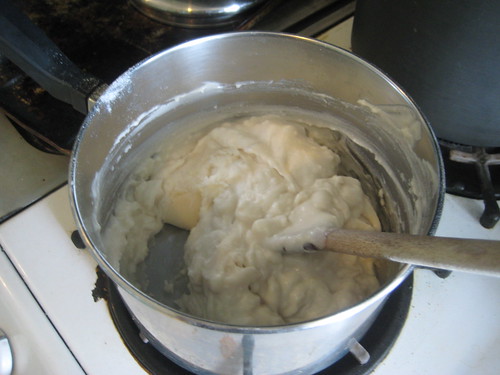
You stir everything together and then cook is mostly to dry the dough. What you end up with is something that looks a lot like sugar cookie dough.

homemade playdough
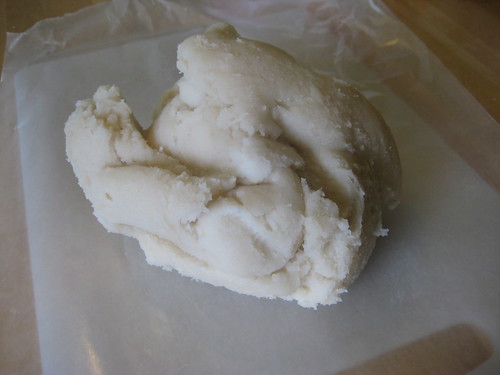
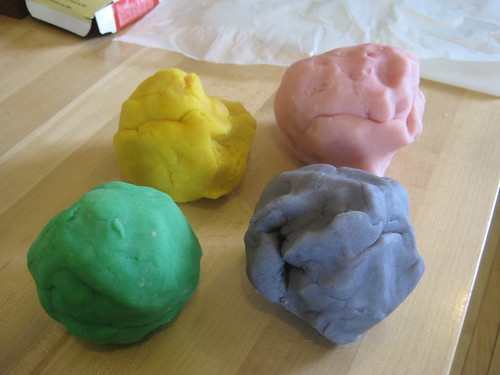
After kneading briefly, I added food coloring, making colors based on my son's shouted requests: "yellow!" and "pink!"
homemade playdough
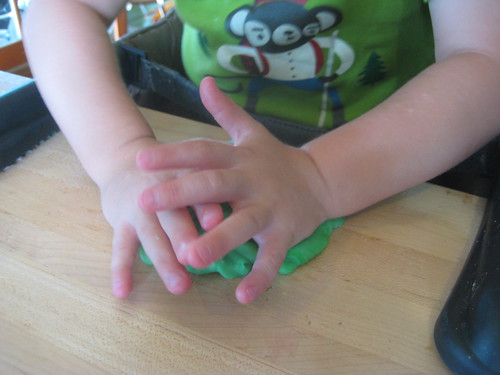
He loves the stuff, and is constantly begging to play with it. I've the play dough it in a big airtight container on the counter, and it seems to be holding up wonderfully. Another nice thing is that this dough can really teach color blending. A little chunk of pink plus some yellow makes a lovely orange after some vigorous toddler kneading.

Oh, and if he eats it, no big deal. Everything in the dough is technically "food." I doubt he would want it after a quick taste, though. It's very salty.
Read More 1 Comment | Posted by Audrey |

Plants in a Baby's Room

As you might imagine, we have plants all over our house. I like the way they look, and some think they help with indoor air quality. So, when we were putting together my son's room, plants were part of the plan. I even got some cute vintage hanging planters off eBay But, as my son got older, I realized that, even if the plants were up high and safe from little hands, their falling leaves were not.

Like most babies, mine likes to put everything in his mouth. So, I did a little research and switched out some of the house plants in his room with less dangerous alternatives. I was happy to read that both Christmas cactus and polka dot plants both appear to be non-toxic. Both are attractive and easy to find, so I picked them up at my local nursery. (Of course, all these lists are really confusing, but I managed to find both listed on a couple of "safe" plant lists.)
hanging planter
My other idea was to pot some herbs, since, obviously, those are okay to eat. I don't have a photo, but I got a nice little thyme plant that's working out nicely. Pictured below are the polka dot plant and a little succulent that grows in a compact way that means it won't drop leaves.
new plants in the baby's room
I'm glad I was able to figure out a way to have plants in my baby's room. Growing things is such a big part of my life, and hopefully my son will feel the same way when he's older. For now, they add interest to his room decorations and he has fun helping me water them. Of course, I plan to prevent him from eating any dropped leaves or flowers, but hopefully if one sneaks past me, it won't make him sick.
Read More 0 comments | Posted by Audrey |

Cloth Diaper Washing

I've been cloth diapering my son for a little over a year now, so I thought this might be a good time to share  my diaper-washing method, in case other prospective parents stumble across this blog. First, let me say that, despite what you might have heard, cloth diapering is not difficult or expensive. Whenever I tell people my son wears cloth, they say, "Wow." Honestly, they shouldn't be impressed. Now, if I was doing EC, then they should say, "Wow," because that takes some serious commitment. But cloth diapering is no big deal.

Anyway, enough proselytizing. As I mentioned in a previous post, my son wears cloth pre-folds with waterproof covers. It seems like everyone has their own washing method, but here's what's kept my son's diapers clean and sturdy for the past year:

Note: I have a front-loading, high-efficiency washer.

Regular wash
1) Put dirty diapers, flannel wipes, covers and diaper pail liner into washer and run a "rinse/spin" cycle on COLD, no detergent. This is basically just to rinse off the, ahem, debris and keep stains from setting.
2) Add roughly 2 Tbl Sp of Planet 2x Ultra Laundry Detergent* and 1/2 cup of vinegar to the fabric softener section. Run the "heavy duty" cycle on HOT.
3) OPTIONAL: If the diapers are particularly dirty or stinky, I sometimes run an additional "quick wash" cycle on HOT with just Borax
4) Remove from washer. Hang cloth pre-folds and wipes on the clothesline, preferably in the bright sun. Hang the covers and diaper pail liner on an indoor line or drying rack, because the sun can degrade the plastic.
5) OPTIONAL: After the pre-folds are dry, put them in the drier for 10 mins just to soften them up a bit.

Stink removal
- For stinky pre-folds, I usually fill up a big bucket with cold water and about 2 cups of Biokleen Bac-Out, and soak the pre-folds in this mixture overnight.
- For stinky covers, Thirsties recommends that you run a wash with a small amount of chlorine-free bleach powder, like OXO-Brite. This method has worked for me.

And that's it! Honestly, if you use pre-folds, you can purchase enough so you only have to wash diapers every 3 days or so. Dakota and I both have full-time jobs, and don't find diaper-washing to be a major time suck.

And now for a baby photo, just because. This is my son watching his dad build the deck.

IMG_8706

* Planet is one of the recommended detergents on this cloth diaper detergent chart, and it's both cheap and wildly available.
Read More 2 comments | Posted by Audrey |

Tag Blankets for Babies

At the moment, my son really likes grabbing, pulling and licking fabric, and he has a commercially-made Taggies blanket that he plays with frequently. A couple of weeks ago, I decided to make some cute and simple baby tag blankets myself. I had some leftover fleece from my son's Halloween costume (he went as a cactus) and the sewing machine was already out, so it seemed like a perfect time.

IMG_6936.JPG

The blankets are very simple to make. You cut out a square of fleece and a square of colorful fabric, choose some cute ribbon from your stash--I always save the cloth ribbon from gifts so I have lots of little pieces in different colors and patterns--and fold them over into tabs. Place the right sides of the fabic and fleece together, slip the tabs of ribbon (loop in) in between the fleece and fabric, and pin them in place. Then stitch around the edge using a simple stitch and leaving a small hole on one edge. Snip off the corners of the fabric and turn it right side out through the hole. Finally, I top-stitched the whole thing with a contrasting zig-zag stitch for extra strength and cuteness. And, done! Even a not-very-talented sewer like me can whip a bunch of these up in an afternoon.

For one of the blankets, I got fancy and added some crinkle. All you have to do is sew a layer of crinkly plastic into the interior of your blanket. Since it was Halloween, I used a candy bag. But you could also use a potato chip bag or an empty baby wipes bag. Really any thick cellophane would work. It's a bit trickier to sew, but since it's hidden inside your blanket, you don't have to get that pretty with it.

sewing in the crinkle

These tag blankets were really fun to sew, and the combination of colorful fabric and ribbon makes them really cute. All my blankets were handed out to new babies I know or mailed off to far-away baby friends. Hopefully they'll all enjoy them as much as my son likes his.
Read More 5 comments | Posted by Audrey |

Cloth Prefolds: So Many Choices!

As I've mentioned before, I've been cloth diapering my son since he came home from the hospital. My last post about cloth diapers was two months ago, and I'm happy to say that I still find the process pretty easy, and my son is still comfortable and diaper-rash free.

When I was researching cloth diaper options, I decided on prefolds pretty quicky. But then, I discovered there are many, many different types of prefolds! Some common choices are Chinese prefolds, Indian prefolds, organic cotton, hemp, bleached and unbleached. Then, there are different thicknesses. Typical diaper thicknesses are 4x6x4 or 4x8x4, meaning that each side of the prefold is has four layers and the strip in the middle has six or eight layers, respectively. After discovering all these different types of prefolds, I was a bit overwhelmed. So, I basically just registered for a few different kinds in the "infant" size so I could see which ones I liked best.

Let me just say, to any soon-to-be parent reading this, all of the prefold diapers work--even the much-maligned regular old Gerber diapers. But, I definitely found some diapers I liked better than others, so I though I'd share my thoughts.

Different brands and types of diapers have slightly different shapes, particularly after washing. Pictured below with the purple edge are Diaper Rite Prefolds, size small, and Bummis Organic Prefolds, also size small. As you can see, the Diaper Rite diapers are significantly wider than the Bummis, which are slightly longer. Both look kind of bumpy, which is what they should look like after washing. Diapers come unwashed and will shrink and become more absorbent after a thorough pre-washing in hot water.

cloth prefolds

Next up is a BabyKicks Hemp Prefold in size small. This one has been washed several times, and you can kind of see how tight the knit is. This diaper is about as wide as the Bummis diaper, but much thinner. That's the big plus of hemp: it's very absorbent but thinner, and therefore less bulky when folded. The downside, in my opinion, is that my hemp diapers got quite rough after a couple of wash/dry cycles. Now, I'm reluctant to put these rough diapers directly against my son's tender nether region--although I do still use them when I'm layering two diapers at night.

IMG_6353.JPG

Not pictured are the Kushies Prefold Diapers, which I also own. These diapers are thinner, 2x4x2, and longer than the other cotton diapers we use. To be honest, they're a bit too long for my needs, but I do use them when I'm layering diapers for nighttime, as mentioned above. I guess I might use them more when my son gets older.

Also shown in the photo above are the two types of reusable flannel wipes we've been using. They both work well and are just thin pieces of unbleached cotton flannel that have been hemmed with a serger or zig-zag stitch. If you have the patience and sewing skills, you could make them yourself. Otherwise, go for the cheapest ones--although I guess the ones done with a serger will likely last a little longer than the zig-zag ones, a few of which have started to lose some hem stitches.

Thus far, my favorite diapers are the Diaper Rites, which can be found online at Diaper Junction. I like the extra width, because, at the moment, my son is chubby for his age, but of average height. If you want to Snappi your diapers before you cover them, then the Diaper Rites are a good choice because you can get them all the way around fat baby thighs. If you plan to just close up the diapers inside your diaper covers, then either one will work for you--as will the even cheaper and just as effective Chinese Prefolds. So, if you don't plan to Snappi and are on a budget, go with Chinese Prefolds. At less than $2 a diaper, they're pretty cost-effective. Diaper Rites are slightly more expensive, but quite high-quality, so if you're planning to use diapers for more than one kid, they might be a good bet.

This is by no means a complete review of cloth prefolds, but I wanted to share my experience with the hope that it will help another mother or father out there trying to sift through all the options. Feel free to leave your own thoughts on cloth diapering in the comments.

Coming soon... cloth diaper washing! (Thrilling, I know.)
Read More 2 comments | Posted by Audrey |

Cloth Diapering: Prefolds & Covers

Although there's a fair amount of debate about whether cloth diapers are better for the environment than disposable, I didn't really spend much time worrying over what to use with my son. In my (admittedly brief) search, I was unable to find a clear, definitive study about which method is really "greener." Most arguments seemed to be tinged with a fair amount of bias toward one type, and many against cloth had a lot to do with how the diapers were being cleaned. (More on that later.)

In truth, part of my decision to cloth diaper my son was emotional. I just couldn't stomach the idea of throwing away bags and bags worth of plastic diapers every week for years. Imagining all those diapers piling up in a landfill made me uncomfortable. So, I sought out a smart, inexpensive and user-friendly cloth diapering alternative. Happily, I think I found one.

After looking into cloth with disposable inserts, all in ones, and pocket diapers, I decided to keep it simple and go with cloth prefolds. Cloth prefolds are basically just rectangles of cotton (or other absorbent fibers) divided into thirds with seams. The middle third is thicker than the two on the sides, and thus more absorbent.

You can use prefold diapers several ways, but I am keeping it simple by folding them into thirds and then fanning out the back and wrapping the "wings" around my baby. The whole thing is fastened in the front using a Snappi. If you use prefolds, I highly recommend that you get a few Snappis. My mom, who cloth diapered me when I was a baby in the late 70s, thought they were a massive improvement over the diaper pins she had to use.

cloth prefold with snappi

After the diaper is on, I cover the whole thing with a waterproof cover to keep my son's clothes from getting wet when the diaper does. I'm primarily using Thirsties diaper covers. The one pictured below is called a Thirsties Duo Wrap. The snaps on the front make it adjustable so that you can use it on your newborn and then undo the snaps when he gets bigger. So far, the covers have successfully kept the wetness (and poop) on the inside, and they are easy to use and wash.

diaper cover

Speaking of washing... Most arguments against cloth mention the large amount of water and electricity required to clean diapers, but I think I'm doing pretty well on that front. We have a front-loading, energy and water-efficient washer, and I recently got an awesome umbrella-style clothesline. So, in my case, I think cloth diapers will actually end up being better for the environment--and cheaper--than even unbleached disposables.


line drying diapers

That's pretty much the basics of my cloth diapering experience so far. I haven't found the process to be particularly time-consuming or difficult (another argument often used against cloth), and my son seems quite happy in his prefolds. In fact, he's yet to get diaper rash, which seems like a good sign.

I have much more to say about cloth diapering. Like most things involving babies, there are many accessories you can buy and even more opinions about how to use, wash and clean cloth diapers. I'll post more about those topics soon.
Read More 6 comments | Posted by Audrey |

Where I've Been

If you're a regular reader of this blog, you may been wondering why I haven't been posting much lately. Well, I have a really good excuse: I had a baby!

He's a boy and he's pretty great so far. But, unsurprisingly, he's been using up some of my gardening, chicken keeping, cooking, crafting and blogging time. I did still manage to plant a partial summer garden, which I'll write about soon, along with a chicken and kitchen update. And there are many, many baby-related blog posts in the works.

As you may have guessed, we are trying to be frugal, resource-efficient and sustainable parents. That started before the boy even arrived, with solicitations to friends for their hand-me-downs and purchases of gently-used items off of craigslist. (No one should ever buy a new co-sleeper. There are so many practically new ones for sale online.) And it continues now that he's here, with cloth diapers, handmade toys and green cleaning products.

For now, though, I'll leave you with this photo of his tiny baby toes. Because, let's be honest, all I really want to talk about is how cute he is.

baby toes!
Read More 5 comments | Posted by Audrey |
Older Posts Home

GREEN FRIEDA

  • About
      This blog is about a variety of things I'm interested in, including gardening, backyard chickens, crafts, DIY home improvement and resource efficiency. My hope is that it's both informative and fun to read. I hope you like it. If you want to email me, click here.
  • Labels

    • animals (8)
    • baby (7)
    • bathroom (4)
    • cactus (1)
    • canning (1)
    • charities (3)
    • chickens (79)
    • compost (1)
    • crafts (9)
    • energy (8)
    • environment (24)
    • food (61)
    • gardening (137)
    • gifts (7)
    • good girls (10)
    • holiday (6)
    • home improvement (27)
    • insects (2)
    • kids (4)
    • kitchen (16)
    • native plants (16)
    • orchard (6)
    • pests (14)
    • politics (6)
    • reuse (16)
    • tips (10)
    • tree (1)
    • waste (2)
    • water (9)
    • wedding (2)

    Blog Archive

    • ▼  2014 (5)
      • ▼  June (2)
        • Chicken Landscaping
        • Poor Baldy
      • ►  May (1)
      • ►  April (2)
    • ►  2013 (20)
      • ►  November (3)
      • ►  June (6)
      • ►  March (5)
      • ►  February (3)
      • ►  January (3)
    • ►  2012 (13)
      • ►  September (1)
      • ►  August (2)
      • ►  July (2)
      • ►  May (1)
      • ►  April (2)
      • ►  February (1)
      • ►  January (4)
    • ►  2011 (33)
      • ►  December (3)
      • ►  November (5)
      • ►  September (1)
      • ►  August (3)
      • ►  June (7)
      • ►  May (2)
      • ►  April (4)
      • ►  March (1)
      • ►  February (4)
      • ►  January (3)
    • ►  2010 (34)
      • ►  November (3)
      • ►  October (2)
      • ►  September (4)
      • ►  August (5)
      • ►  July (3)
      • ►  June (3)
      • ►  May (1)
      • ►  April (6)
      • ►  March (5)
      • ►  January (2)
    • ►  2009 (94)
      • ►  December (6)
      • ►  November (8)
      • ►  October (6)
      • ►  September (6)
      • ►  August (9)
      • ►  July (13)
      • ►  June (12)
      • ►  May (12)
      • ►  April (3)
      • ►  March (8)
      • ►  February (6)
      • ►  January (5)
    • ►  2008 (54)
      • ►  December (4)
      • ►  November (3)
      • ►  October (3)
      • ►  September (3)
      • ►  August (7)
      • ►  July (6)
      • ►  June (9)
      • ►  May (2)
      • ►  April (2)
      • ►  March (4)
      • ►  February (7)
      • ►  January (4)
    • ►  2007 (16)
      • ►  December (3)
      • ►  November (1)
      • ►  October (3)
      • ►  August (3)
      • ►  May (2)
      • ►  April (2)
      • ►  February (1)
      • ►  January (1)
    • ►  2006 (28)
      • ►  November (1)
      • ►  October (3)
      • ►  August (3)
      • ►  July (1)
      • ►  June (4)
      • ►  May (5)
      • ►  April (1)
      • ►  March (5)
      • ►  February (2)
      • ►  January (3)
    • ►  2005 (10)
      • ►  December (1)
      • ►  November (1)
      • ►  October (2)
      • ►  September (1)
      • ►  July (1)
      • ►  June (4)

    Related Blogs

    • Homegrown Evolution
      Framed
      3 years ago
    • DigginFood
      How to gain popularity through buying Twitter followers
      8 years ago
    • The Tangled Nest
      The First Egg: Light, Life, and Gratitude
      9 years ago
    • Monkey Lobster
      Summer Slide Show
      10 years ago
    • Rambling LA
      LOSING YOUR LAWN
      11 years ago
    • Rancho Garbanzo
      3 1/2 years later - Our Wedding Photobook
      11 years ago
    • Urban Chickens
      Infographic time: the chicken coop checklist
      12 years ago
    • Ramshackle Solid
      Hoop and Pole
      12 years ago
    • Our Yellow House
      Still Knitting
      12 years ago
    Show 5 Show All
    Follow GreenFrieda on Twitter

    Links

    • Backyard Chickens
    • Tree People
    • Seed Savers Exchange
    • L.A. Works
    • to do something
    • Mohair Gravy

    Followers

  • Search


    • Home
    • Posts RSS
    • Comments RSS
    • Edit

    © Copyright Green Frieda. All rights reserved.
    Designed by FTL Wordpress Themes | Bloggerized by FalconHive.com
    brought to you by Smashing Magazine

    Back to Top