• Home
  • Posts RSS
  • Comments RSS
  • Edit
Blue Orange Green Pink Purple

featured post

Homemade Granola

Recently I tried making my own granola. It ended up being quite simple, and I recommend trying it yourself. Dakota and I both find most store-bought granolas way too sweet and full of "extra" flavors. So, my goal was to make granola that was simple, healthy and tasty.

Read More

Tip #3: Location Matters

Like many people, I have limited space for my vegetable garden. The combination of large, shady trees and a steep slope means I don't have many sunny spots in my backyard to put seeds in the ground. So, for me, carefully planning a garden layout is key.

Through a combination of trial-and-error and research, I've learned that you can't skimp on sunshine when it comes to certain crops. In particular, summer squash needs an extremely sunny spot. Last year, I planted in a location that got a bit too much afternoon shade and didn't get a single zucchini. (How embarrassing! I mean, zucchini is supposedly the easiest vegetable to grow.)

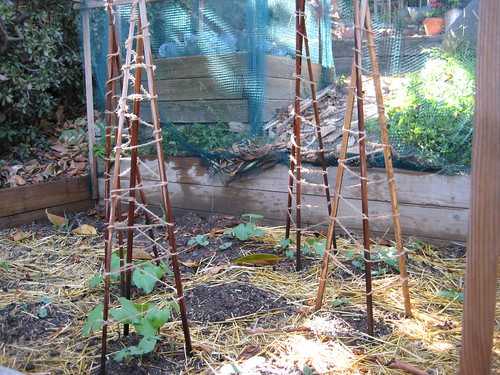
This year, I've got my squash, green beans and corn in my sunniest plot, just above the cactus patch. These crops should grow well together, since corn and beans grow up and squash grows out. That's the idea, anyway. So far, all three crops doing well, and I'm thinking this year's squash crop will be less humiliating.

bean poles and squash hills

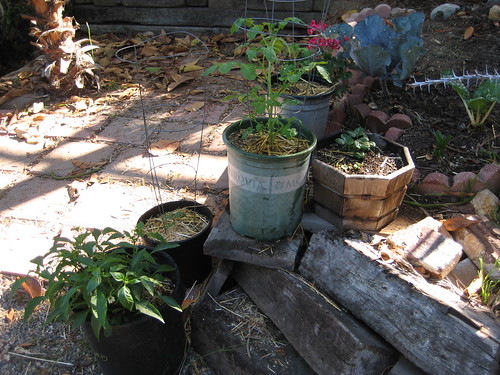
I've found that other summer veggies, like peppers and carrots, can handle a bit more shade--although not too much. So, I've got those guys growing in slightly shadier spots. I'm lucky in that Southern California summer days are long and hot, so almost any spot is sunny for a couple of hours. Still, when planning your garden, I recommend you take into account various crops sunlight needs as much as you can.

A good reference for figuring out where to plant your veggies is Burpee's The Complete Vegetable & Herb Gardener. It's a giant reference manual that gives good advice on where to plant almost every vegetable in your garden, alongside detailed information on fertilizer needs and other important tips. Despite my trail-and-error tendencies, I have found this book to be extremely helpful.

To be honest, though, everyone's garden is different. I think you have to keep testing different crops in different areas until you find the right spot and configuration for ideal production*. Tree trimming regularly would also probably help.

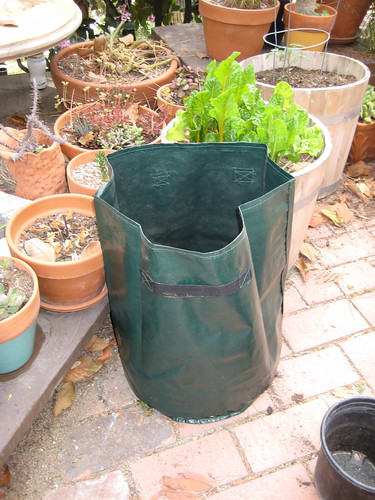
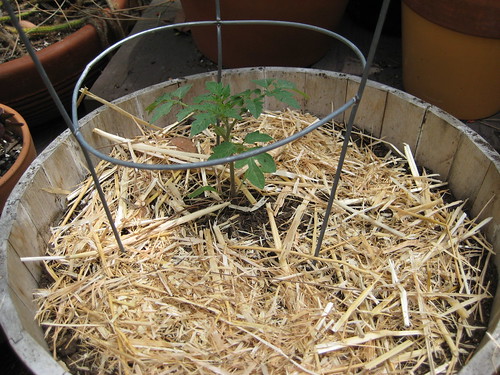
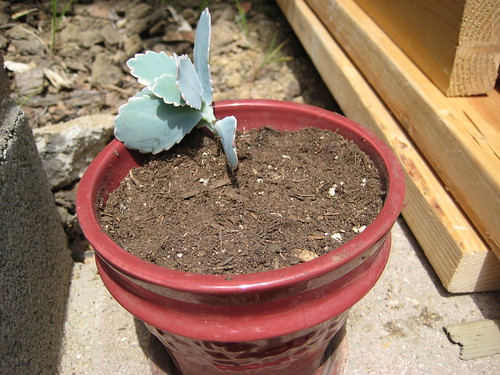
And, obviously, container gardening helps solve some of my space and sunlight issues. I'm growing tomatoes almost exclusively in containers this year. This will save me space, and allow me to move my plants to sunnier--or shadier--spots on the patio as needed.

tomatoes, peppers and strawberries

* Once I find the right spot for my in-ground veggies, I'll have to confront the whole issue of crop rotation--which is daunting considering my limited space. Perhaps since I'm growing small crops mixed together, it won't be too bad to grow the same crop in a very similar location the following year. We'll see...


Read More 2 comments | Posted by Audrey |

Tip #2: Mulch Like You Mean It

Time for another in my series of Tips from a Trial and Error Gardner. This time, I'm talking mulch.

eggplant seeding

In the last couple of years, I've learned that mulch is essential in my vegetable garden--especially when gardening in containers and most especially in the summer. The dry, hot summers of Southern California will dry out dirt quickly, and mulch can help keep the soil evenly moist and your plants healthy. Mulching also means you don't have to water your plants as heavily or as often.

Summer plants like tomatoes and eggplants don't respond well to fluctuations in soil moisture level. When the soil goes through a cycle of getting wet and drying out completely, your veggies can get blossom end rot. This has happened to me before, and, let me assure you, it's frustrating. Basically, a brownish or grayish spot appears on the end of a fruit as it grows, ruining it. Mulching can help prevent blossom end rot by holding water in the soil when it might otherwise evaporate. I've managed to stop blossom end rot in my vegetables by mulching around the base of my tomatoes and eggplants. This year, I'm doing the same with my squash, which are also known to suffer from blossom end rot.

In terms of what type of mulch to use, there are many options: bark, garden plastic or, my current favorite, hay. They all work fairly well. The nice thing about hay is that I can just turn it into the soil at the end of the season and it should break down quickly. (Plus, I use it as bedding in my chicken coop first.)

That's it for my thoughts on mulching. I have a couple more gardening tips in mind, and I plan to role them out in the next few weeks. Hopefully, at least one reader will find them helpful.

Previously: Tip #1
Read More 8 comments | Posted by Audrey |

What's wrong with this strawberry?

Recently, I posted about my first attempt at growing strawberries. I got several comments about how fun and relatively easy they are to grow, so I'm hoping to get some good advice now. Does anyone know what is wrong with this poor strawberry plant?

what's wrong with this strawberry

The other two are doing pretty well, but this one hasn't really grown new leaves, and the old ones are turning brown and dying rather quickly. Has anyone had this problem before?

My guesses:
1) I am over-watering.
2) I am under-watering.
3) It's not getting enough sun.

Currently, I'm experimenting by moving it to a sunnier spot and watering it less frequently. Any suggestions or tips about watering strawberries would be much appreciated.

Thanks!
Read More 8 comments | Posted by Audrey |

Like Chickens to a Hay Bale

My chickens have a new obsession. Every time I let them out to free range, they are drawn to it like moths to a flame. Peggy and Tina just can't get enough of the hay bale.

chickens check out the hay

I don't know what it is about the hay that gets them so excited. They have plenty of dry weeds in the yard to yank up and fling around. Maybe it's the scent? Or maybe there's some kind of innate chicken sense that says, "Yes, I am a farm animal, and farm animals love hay." All I know is, no matter how many times I chase them away from it, the hens just keep coming back to the hay bale.

On the bright side, I'd rather the chickens pick at and obsess over the hay bale than my vegetable garden. I chase them away because they make such a mess, throwing hay all over the patio. But, really, I'd rather have a messy patio than come outside to discover they've pulled up all my bean sprouts.
Read More 1 Comment | Posted by Audrey |

Growing Potatoes in Big Green Bags

This year, I decided to try growing potatoes for the first time. The rumor is that they're pretty easy to grow, and I am a fan of potatoes any way you cook them. So, I ordered some seed potatoes from Seed Savers. I went with a variety called German Butterball, which are supposed to be tasty and to store well. (Note: You have to order your seed potatoes in advance and then choose the date in Spring when you'd like them to ship out. I chose an early date, since the climate is so mild here)

When my seed potatoes arrived in mid-March, I followed directions and placed them in a sunny but not-too-hot spot so that they could sprout. I went with the windowsill in the guestroom.

seed potatoes

After about three weeks, the seed potatoes all had some nice green sprouts growing out of their eyes. My instructions said I should wait until the sprouts were 1 inch long. But, after another couple of weeks, that didn't seem to be happening, so I just went ahead and planted the seed potatoes as they were.

potatoes in the window

Because my garden space is limited, I decided to plant my German Butterballs in special Potato Planter Bags. They're basically big, green plastic bags with drainage holes at the bottom and sturdy handles. The bags come with fairly elaborate instructions about planting your potatoes in stages. Basically, as the green stalks grow, you add in more soil and compost. So the top of the soil slowly rises up as your potatoes grow.

potato bag

Here's how the potatoes look today after two weeks in the bags. The leaves and stems seem fairly healthy, as far as I can tell. I was worried that planting them before they had a 1-inch sprout would mess them up, but that doesn't seem to be the case. I put a lot of compost in the bags, so I'm sure that's helping.

IMG_3797.JPG

It'll soon be time to add the next layer of soil and compost. And then I'll just have to be patient. According to Seed Savers, these guys need 100 to 120 days to reach maturity.
Read More 4 comments | Posted by Audrey |

We Have a Floor!

new flooring

Check that out! That is new flooring going down in the kitchen. New, beautiful, oak flooring--although, part of it isn't "new" at all. More on that later.

Dakota started laying the floor last weekend, after spending the previous weekend sanding down the subfloor. He rented a big belt sander from the hardware store, and spent a day scraping and sanding the subfloor until it was smooth, clean and ready for the next step. Here's Nigel enjoying the sanded subfloor.

Nigel shows off the sanded subfloor

Last weekend, the real floor started going down. It's red oak, to match the floors in the rest of our house. Most of the flooring was actually made from the old oak cabinet doors that were in our previous kitchen. Dakota had this brainstorm a while back, and I got really excited about it because reusing the old doors is both money-saving and environmentally friendly.

Cutting and milling down the cabinet doors and then adding a tongue and groove was quite an elaborate and labor-intensive process. (It's possible Dakota regretted his brilliant idea once he actually put it into action.) But, the result is really lovely. Dakota was able to make enough floorboards to cover most of the area, but we did have to purchase some new boards to complete the floor.

He's hoping to get all the floor down before next weekend, when my parents come to visit. One thing we still need to do is decide on an eco-friendly floor finish. I'm current searching the web for a low-VOC and as non-toxic as possible polyurethane finish. Suggestions are welcome.
Read More 2 comments | Posted by Audrey |

First Apple Blossom

Pink Lady blossom

My Pink Lady apple tree started to bloom last weekend. It looks so pretty. The buds are pink before they bloom, and then they burst open into a frilly white flower.

Honestly, I'm relieved to know that the apple tree is doing well. I've been watering it religiously, but until recently it just had a few sad looking leaves hanging from its thin branches. Now, green leaves are appearing and buds are coming alive all over the place. Perhaps my fruit tree murdering streak is finally over. I did manage to bring my fig back to life, after all.

I've never grown my own apples before, so I'm very hopeful that the blossoms will be pollinated, the fruit will grow and I'll be picking beautiful, organic Pink Lady apples this Fall. I went apple-picking with a friend once outside of Boston, and the fresh-from-the-tree apples were so deliciously juicy and crisp. I'll be so happy if I can eat apples like that from my very own backyard orchard.
Read More 4 comments | Posted by Audrey |

New Attic Insulation

Cellulose insulation

Yesterday I had to work from home, so I decided to take advantage of that fact and have the attic insulated. This is something we've been planning for a while, and I wanted to get it done before the weather became too hot. So, I called up Everguard Home Insulation and made an appointment to have cellulose insulation blown into the attic.

Everguard was great. They showed up as scheduled, after calling to let me know they were on the way, and communicated clearly about what they were planning to do. They worked quickly and cleanly and got our 950 ft2 attic filled in about 45 minutes. Impressive.

The fluff blob above is a small chunk of the cellulose insulation that escaped from a roof vent. As you can see, it's basically fluffy, ground-up newspaper and cardboard fibers. To make it fire retardant, the cellulose is treated with boric acid. Unlike fiberglass, cellulose is recycled, environmentally friendly and non-toxic. So, it's perfect for green-living homeowners, like us.

And for frugal homeowners, the Southern California Gas Company offers a rebate of 15 cents per ft2. So we'll actually get a check for $142.50 after we submit our paperwork. Plus, there's a 2009 federal energy efficiency tax credit for 30% of the cost. So, we'll get even more money back when we file our tax returns. With all those incentives, I can't imagine not insulating the attic.

The new insulation, combined with some old, compressed and ratty fiberglass that was already up there, brings our attic insulation level up to R-38. This should hopefully make a big difference in how hot it gets inside the house this summer, especially when combined with new wall insulation, new ceiling fans and our solar attic fan.

I've said it before and I'll say it again, Who needs air conditioning! (Check back with me in July for the verdict on that one.)
Read More 5 comments | Posted by Audrey |

Honeysuckle in Bloom


honeysuckle in bloom
Originally uploaded by mipsy6
I love the scent of honeysuckle. We have a big vine growing on the corner of the house beneath the living room windows. I planted it a few years ago, and it's really grown in nicely.

This time of year, I catch the scent of it when I walk past it in the morning. And at night, the smell blows in through the open windows. There's something about the scent that makes me instantly happy.

Nothing says Spring like a honeysuckle in full bloom.
Read More 1 Comment | Posted by Audrey |

Sock-posting

Did you know you can compost your old socks? I should have known, since my sister told me a while back that I could compost dryer lint. Turns out, you can put any old cotton, silk or wool clothes in the compost. They're made of natural fibers, after all.

I learned about composting old clothes while watching a very funny and odd "instructisode" by The Guide Girls. They're a comedic/environmental duo who make informative videos about greening your lifestyle. My friend Sarah told me about them, and I recommend that you check them out. They're funny and helpful.

Anyway, I decided to try putting some old socks in my compost pile. I chopped them up into small bits to help them break down more easily, and I cut out the elastic band at the top. Dakota goes through a lot of socks, and we can't use all of them as rags. So, this seems like a great way to get rid of old cotton clothes that can't be donated, like socks, underwear and, well, rags.

sock scraps in compost

Speaking of composting, a couple of friends recently asked me what kind of kitchen compost bin I'd recommend. I've tried a few options, including the plastic kind with the charcoal filter in the lid, and I think my current setup is my favorite. It's a stainless steel pail, which doesn't absorb any gross smells or harbor any nasty bugs. For easier dumping and cleaning, we line the bin with BioBag Waste Bags, which break down in the compost bin. Basically we just dump it, spray it down with the hose, let it dry in the sun and it's ready to be refilled with kitchen scraps.

compost bin

I know other people like to keep their compost in a resealable plastic container in the freezer. That seems like it would work pretty well, too.
Read More 2 comments | Posted by Audrey |

Hey Hey Hay

Nothing makes you feel like a true (urban) farmer like a big bale of hay. We got our first hay bale last weekend, and the plan is to get a variety of uses out of it.

hay bale

First, it'll be used as bedding in the chicken coop. For the past year, we've been using cedar shavings* that were the byproduct of a fence Dakota built a while back. He brought home 6 or 7 large trash bags of the shavings, which we used to line the floor of the coop. It worked really well and, better yet, was free. But, last weekend, the cedar shavings finally ran out, so it was off to a feed store in Burbank for a bale of hay.

Here it is lining the bottom of the coop, before I replaced the removable slatted floor. (That white stuff is diatomaceous earth, which is supposed to keep fleas and other bugs away.)

hay bedding in coop

After the hay has served its purpose as a poop receptacle, it'll go onto its second life as mulch for my summer garden. I found out last year that a layer of mulch can make a BIG difference for my container plants like tomatoes and eggplants. And I know hay is also recommended as a mulch for squash hills.

I already put some hay scraps on my first container tomato of the season. Now that the temperature is rising, I know it'll help the plant stay perky and healthy.

hay mulch on tomato

* A note about cedar shavings and chickens: I have read on many message boards that cedar can be toxic to a chicken's respiratory system. That has not been my experience. We used cedar shavings for a year, and saw no ill effects for our hens. I should clarify that our chickens didn't bed down directly in the cedar. It was in a thin layer below the slats of the coop floor. I also know that Barbara Kilarski recommends cedar shavings in her book, Keep Chickens! So, I guess it's an individual choice for each chicken owner to make.


Read More 11 comments | Posted by Audrey |

The Joy of Cuttings

cutting with roots

I love growing new plants from cuttings. It appeals to my twin desires to save money and beautify my environment with lots and lots of plants. I have a couple of Copper Canyon Daisy bushes growing along our back fence that started out as cuttings. After a couple of years, they're as big and bushy as the original plant they came from.

Recently, I started a few new cuttings, including some Copper Canyon Daisies, White Sage and a variety of succulent whose name I don't know. I just take some clippings from a plant, place each one in an empty jelly or olive jar full of water and sit them in a sunny windowsill. Easy-peasy. A couple of them rooted up quite quickly, so I planted them in pots this morning.

planted cutting

The White Sage takes a bit longer to grow roots. I've only successfully grown one of those. I think the woodier the stem, the more difficult it is to grow the plant from a cutting. For a gardening geek like me, it's kind of fun to experiment and see what plants I can manage to coax a root from. I'll let you know how it goes with the rest of my current cuttings.

Not to encourage any questionable activity, but growing from cuttings can also be a good way to get a new plant from one you like in your neighbor's yard. You just break off a small stem from a big, healthy bush while you're, say, walking by with your dog. Pop it in your jar of water, and pretty soon you've got a tiny version of their lovely plant--for free!
Read More 5 comments | Posted by Audrey |
Newer Posts Older Posts Home

GREEN FRIEDA

  • About
      This blog is about a variety of things I'm interested in, including gardening, backyard chickens, crafts, DIY home improvement and resource efficiency. My hope is that it's both informative and fun to read. I hope you like it. If you want to email me, click here.
  • Labels

    • animals (8)
    • baby (7)
    • bathroom (4)
    • cactus (1)
    • canning (1)
    • charities (3)
    • chickens (79)
    • compost (1)
    • crafts (9)
    • energy (8)
    • environment (24)
    • food (61)
    • gardening (137)
    • gifts (7)
    • good girls (10)
    • holiday (6)
    • home improvement (27)
    • insects (2)
    • kids (4)
    • kitchen (16)
    • native plants (16)
    • orchard (6)
    • pests (14)
    • politics (6)
    • reuse (16)
    • tips (10)
    • tree (1)
    • waste (2)
    • water (9)
    • wedding (2)

    Blog Archive

    • ►  2014 (5)
      • ►  June (2)
      • ►  May (1)
      • ►  April (2)
    • ►  2013 (20)
      • ►  November (3)
      • ►  June (6)
      • ►  March (5)
      • ►  February (3)
      • ►  January (3)
    • ►  2012 (13)
      • ►  September (1)
      • ►  August (2)
      • ►  July (2)
      • ►  May (1)
      • ►  April (2)
      • ►  February (1)
      • ►  January (4)
    • ►  2011 (33)
      • ►  December (3)
      • ►  November (5)
      • ►  September (1)
      • ►  August (3)
      • ►  June (7)
      • ►  May (2)
      • ►  April (4)
      • ►  March (1)
      • ►  February (4)
      • ►  January (3)
    • ►  2010 (34)
      • ►  November (3)
      • ►  October (2)
      • ►  September (4)
      • ►  August (5)
      • ►  July (3)
      • ►  June (3)
      • ►  May (1)
      • ►  April (6)
      • ►  March (5)
      • ►  January (2)
    • ▼  2009 (94)
      • ►  December (6)
      • ►  November (8)
      • ►  October (6)
      • ►  September (6)
      • ►  August (9)
      • ►  July (13)
      • ►  June (12)
      • ▼  May (12)
        • Tip #3: Location Matters
        • Tip #2: Mulch Like You Mean It
        • What's wrong with this strawberry?
        • Like Chickens to a Hay Bale
        • Growing Potatoes in Big Green Bags
        • We Have a Floor!
        • First Apple Blossom
        • New Attic Insulation
        • Honeysuckle in Bloom
        • Sock-posting
        • Hey Hey Hay
        • The Joy of Cuttings
      • ►  April (3)
      • ►  March (8)
      • ►  February (6)
      • ►  January (5)
    • ►  2008 (54)
      • ►  December (4)
      • ►  November (3)
      • ►  October (3)
      • ►  September (3)
      • ►  August (7)
      • ►  July (6)
      • ►  June (9)
      • ►  May (2)
      • ►  April (2)
      • ►  March (4)
      • ►  February (7)
      • ►  January (4)
    • ►  2007 (16)
      • ►  December (3)
      • ►  November (1)
      • ►  October (3)
      • ►  August (3)
      • ►  May (2)
      • ►  April (2)
      • ►  February (1)
      • ►  January (1)
    • ►  2006 (28)
      • ►  November (1)
      • ►  October (3)
      • ►  August (3)
      • ►  July (1)
      • ►  June (4)
      • ►  May (5)
      • ►  April (1)
      • ►  March (5)
      • ►  February (2)
      • ►  January (3)
    • ►  2005 (10)
      • ►  December (1)
      • ►  November (1)
      • ►  October (2)
      • ►  September (1)
      • ►  July (1)
      • ►  June (4)

    Related Blogs

    • Homegrown Evolution
      Framed
      3 years ago
    • DigginFood
      How to gain popularity through buying Twitter followers
      8 years ago
    • The Tangled Nest
      The First Egg: Light, Life, and Gratitude
      9 years ago
    • Monkey Lobster
      Summer Slide Show
      10 years ago
    • Rambling LA
      LOSING YOUR LAWN
      11 years ago
    • Rancho Garbanzo
      3 1/2 years later - Our Wedding Photobook
      11 years ago
    • Urban Chickens
      Infographic time: the chicken coop checklist
      12 years ago
    • Ramshackle Solid
      Hoop and Pole
      12 years ago
    • Our Yellow House
      Still Knitting
      12 years ago
    Show 5 Show All
    Follow GreenFrieda on Twitter

    Links

    • Backyard Chickens
    • Tree People
    • Seed Savers Exchange
    • L.A. Works
    • to do something
    • Mohair Gravy

    Followers

  • Search


    • Home
    • Posts RSS
    • Comments RSS
    • Edit

    © Copyright Green Frieda. All rights reserved.
    Designed by FTL Wordpress Themes | Bloggerized by FalconHive.com
    brought to you by Smashing Magazine

    Back to Top